CannerTypes 的範例
下面是一個簡單的網站 Schema,我們將用 comment 的方式詳細的說明下面這個 schema 每一步細節。
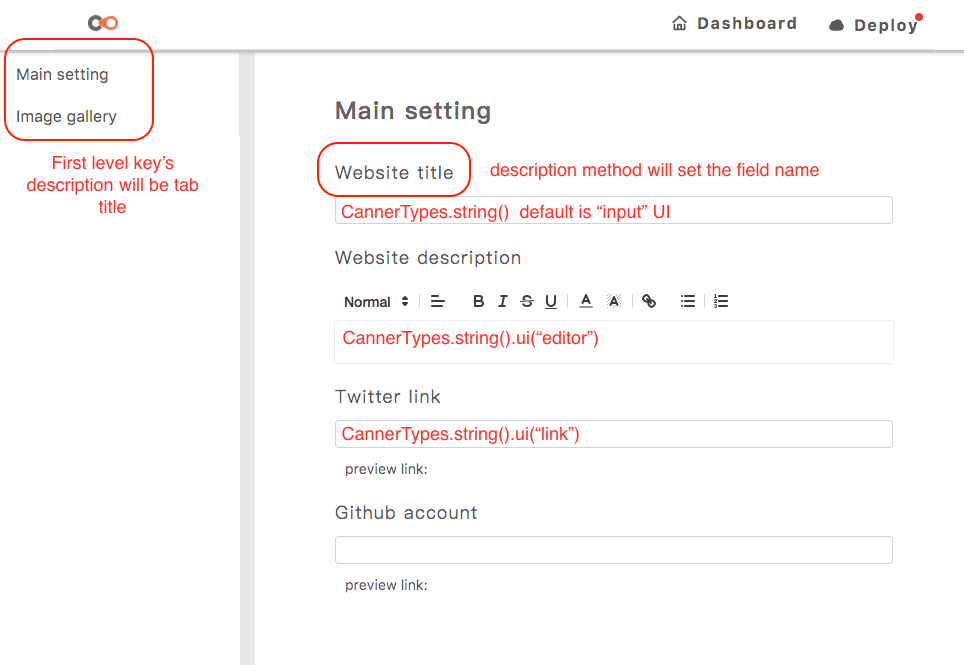
這個 schema 會產生出 CMS 如上圖
1 2 3 4 5 6 7 8 9 10 11 12 13 14 15 16 17 18 19 20 21 22 23 24 25 26 27 28 29 30 31 32 33 34 35 36 37 38 39 40 41 42 43 44 45 46 47 48 49// setup the default firebase CannerTypes.endpoint('firebase', { // Firebase configuration, these data can be found in project overview in firebase apiKey: "API KEY", authDomain: "AUTH DOMAIN", databaseURL: "DATABASE URL", projectId: "PROJECT ID", storageBucket: "STORAGE BUCKET", messagingSenderId: "MESSAGING SENDER ID" }) // Create a simple input for title, in string type if you don't specific your ui, the default ui will be `input` const title = CannerTypes.string().title('Website title'); // use editor to edit website description const description = CannerTypes.string().title('Website description').ui('editor'); // use link ui to edit twitter link const twitter = CannerTypes.string().title('Twitter link').ui('link'); // use link ui to edit github account const github = CannerTypes.string().title('Github account').ui('link'); // The first level of every schema must eithor object or array. const main = CannerTypes.object({ title, description, twitter, github }).description('Main setting'); // Using image ui to upload image to canner service, you could change service to `imgur` if you want to upload to imgur. const image = CannerTypes.string().title('My Image').ui('image').uiParams({service: 'canner'}); // an input for image title const imgTitle = CannerTypes.string().title('Image title'); // an editor for image description const imgDescription = CannerTypes.string().title('Image description').ui('editor'); // Image gallery is an array, so you have to use CannerTypes.array(). The default UI for array is `tab` const photos = CannerTypes.array({ image, imgTitle, imgDescription }).title('Image gallery'); // The top level of the object must be array or object type. module.exports = {main, photos};
查看所有可以用的插件。
參考資料
- @canner/cli: 簡介
- @canner/cli: 上傳 schema 到 Canner
- @canner/cli: 匯入資料到 Firebase